


8 Essential Water Heater Maintenance Tips for Los Angeles Homeowners in 2025
- Dec 30, 2025
- 19 min read
Is that strange popping sound from the basement a ghost? Probably not. It's more likely your water heater begging for attention. When a water heater is neglected, it doesn't just fail without warning; it silently drives up your energy bills and poses a risk of catastrophic leaks, turning a routine morning into a surprise cold shower. For homeowners across Los Angeles, where hard water minerals accelerate internal damage, proactive maintenance isn't just a good idea—it's essential for protecting your home and budget.
This guide provides a comprehensive checklist of actionable water heater maintenance tips designed to extend your unit's life, improve its efficiency, and prevent costly emergency calls. We move beyond generic advice to give you a clear, step-by-step roadmap for both tank and tankless systems. You will learn how to perform critical DIY tasks that save money, recognize the subtle warning signs of impending failure, and understand when it's time to schedule a professional inspection with a trusted expert like ZH Plumbing.
From flushing sediment to testing safety valves and optimizing temperature settings for energy savings, these practices ensure your system runs safely and reliably. Following this checklist will not only preserve your hot water supply but also safeguard your property from the significant damage a neglected unit can cause. Let's get started on protecting your investment.
1. Flush Your Water Heater Tank Annually
Over time, mineral deposits like calcium and magnesium, along with sediment and rust particles, settle at the bottom of your water heater tank. This buildup is especially common in areas with hard water, such as Los Angeles. Annual flushing is a critical water heater maintenance tip that removes this accumulation, preventing a host of problems.
The sediment layer forces the heating element (in electric models) or the burner (in gas models) to work harder to heat the water, leading to higher energy bills and potential overheating. It can also cause corrosion, shorten the lifespan of your unit, and create those unsettling popping or rumbling noises you might hear as water gets trapped and boils beneath the sediment.
Why Flushing Is a Non-Negotiable Task
Regular flushing directly impacts your water heater's efficiency, longevity, and safety. By clearing out the accumulated gunk, you restore direct heat transfer to the water, which can significantly lower your energy consumption. Homeowners in mineral-rich areas like Pasadena and across Greater Los Angeles have reported energy savings of up to 20% after a thorough flush. It's the single most effective step to prevent premature failure and costly emergency repairs.
Key Insight: Consistent annual flushing is how some properties maintain water heaters for 20, 30, or even 40+ years. It's a small investment of time that pays massive dividends in performance and equipment lifespan.
How to Safely Flush Your Water Heater Tank
For a successful and safe DIY flush, follow these essential steps:
Safety First: Turn off the power to your water heater at the circuit breaker (for electric) or switch the gas valve to the "Pilot" setting (for gas). Also, turn off the cold water supply valve.
Cool Down: Allow the water in the tank to cool for at least two to four hours to prevent scalding risks.
Drain the Tank: Connect a standard garden hose to the drain valve near the bottom of the tank. Route the other end of the hose to a floor drain, utility sink, or outside area away from your home's foundation.
Flush and Clear: Open the drain valve and a hot water faucet in your home to allow air in and help the tank drain completely. Once empty, briefly open the cold water supply valve in short bursts to stir up and flush out any remaining sediment. Continue until the water running from the hose is clear.
If the process seems daunting or you haven't flushed your tank in several years, professional service is a wise choice to avoid damaging the drain valve. For those considering an upgrade to avoid this maintenance, you can explore the benefits of a tankless water heater.
Watch this video for a helpful visual guide on the flushing process:
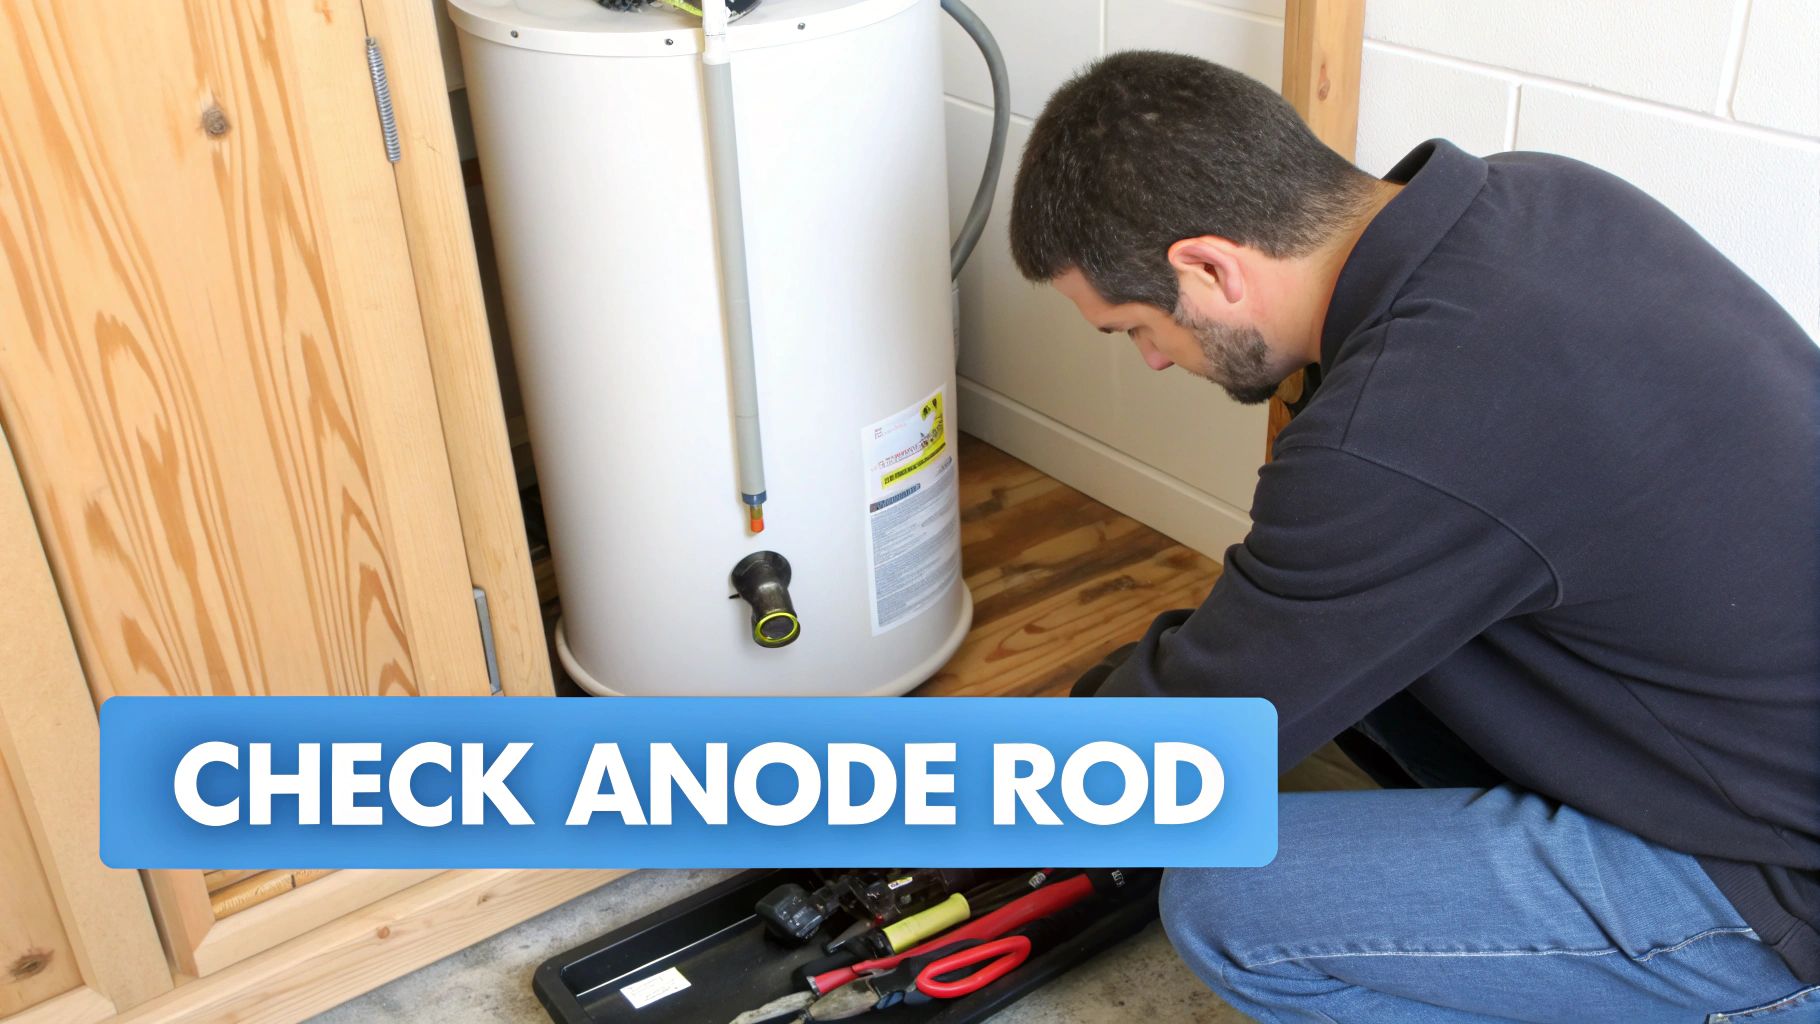
2. Check and Replace the Anode Rod Every 3-5 Years
Often called the "sacrificial" rod, the anode rod is a simple yet vital component designed to protect your water heater tank from the inside out. Made of magnesium or aluminum, this metal rod intentionally corrodes and rusts away so that the steel tank itself doesn't. Regular inspection and timely replacement of this part is one of the most cost-effective water heater maintenance tips to prevent catastrophic tank failure.
As the rod deteriorates, it loses its ability to protect the tank, leaving the steel vulnerable to rust and eventual leaks. In areas with hard water, like much of Los Angeles County, this process accelerates significantly, making proactive checks even more critical. Ignoring the anode rod is a common reason why some water heaters fail in just 8-10 years, while others last for decades.
Why Anode Rod Maintenance Is a Non-Negotiable Task
Proactive anode rod replacement is the key to maximizing your water heater's lifespan and avoiding the immense cost and damage of a burst tank. By sacrificing itself, the rod prevents perforations in the tank wall, which are almost always irreparable. Property managers in Glendale and Santa Monica have drastically reduced premature unit failures and water damage claims by implementing scheduled anode rod inspection programs, effectively doubling the service life of their equipment. This single, inexpensive part is your tank's primary line of defense against internal corrosion.
Key Insight: A $50 anode rod, replaced every 4-5 years, can protect a $1,500+ water heater investment for an extra decade or more. It is the single best preventative measure against internal tank rust.
How to Safely Check and Replace Your Anode Rod
While more involved than flushing, a DIY anode rod check is manageable with the right tools and precautions.
Safety First: Turn off the power at the circuit breaker (electric) or set the gas to "Pilot" (gas). Shut off the cold water supply valve.
Locate and Loosen: The anode rod is typically a large hex-head bolt on top of the water heater. You will likely need a 1-1/16" socket and a breaker bar to loosen it, as it can be very tight.
Inspect the Rod: Once loosened, carefully lift the rod out. If the steel core wire is visible, if it's coated in heavy calcium deposits, or if it has been reduced to less than half its original diameter, it must be replaced.
Install the New Rod: Wrap the threads of the new anode rod with plumber's tape and screw it into place, tightening it securely but without over-torquing. Restore power and water and check for leaks.
Due to the force required and potential for clearance issues with low ceilings, this task can be challenging. If you are unsure or the rod is seized, a professional plumber from a company like ZH Plumbing can perform the replacement quickly and safely, ensuring your tank remains protected.
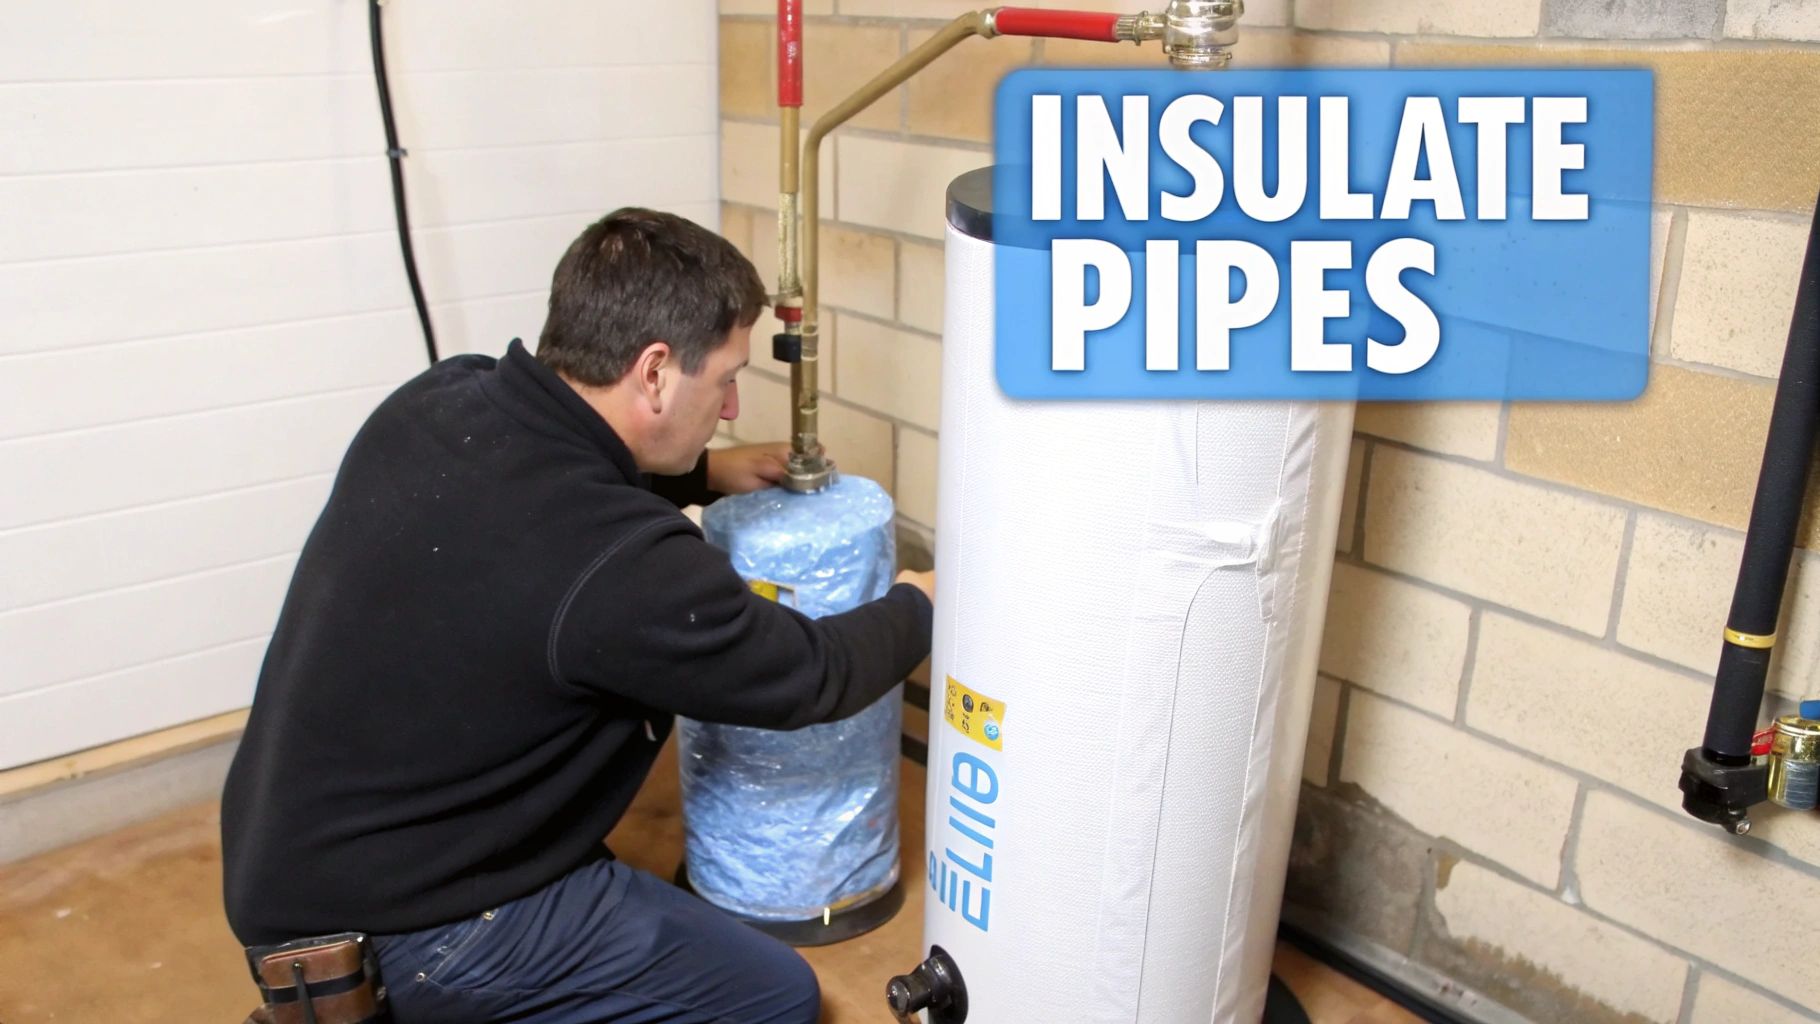
3. Insulate Your Water Heater Tank and Pipes
Your water heater is constantly working to keep the water inside at a set temperature, even when you aren't using it. This "standby heat loss" forces the unit to cycle on more frequently, wasting energy and money. Insulating your water heater tank with a pre-cut blanket and covering exposed hot water pipes with foam sleeves is a simple yet powerful water heater maintenance tip that dramatically reduces this heat loss.
This is especially effective for units located in unconditioned spaces like garages or basements, which are common in many Los Angeles properties. The insulation acts as a barrier, keeping the heat where it belongs: in your water. This means the water stays hotter for longer, reducing the demand on your heater and delivering more consistent temperatures to your faucets.
Why Insulation Is a High-Return Investment
Proper insulation directly translates to lower energy bills and improved comfort. The U.S. Department of Energy estimates that this simple upgrade can reduce standby heat losses by 25-45%, saving you 7-16% on water heating costs annually. Homeowners in areas like Hollywood and Valley Village can see annual savings of $150 to $240, while also enjoying faster hot water delivery to distant bathrooms. It’s an essential step for both energy conservation and financial savings.
Key Insight: Insulating your hot water system is one of the most cost-effective energy-saving projects you can undertake. The materials are inexpensive, and the project often pays for itself in less than a year through reduced utility bills.
How to Properly Insulate Your System
For a safe and effective DIY installation, follow these key guidelines:
Choose the Right Materials: Use a pre-cut water heater insulation blanket with an R-value of at least R-8. For pipes, use foam pipe sleeves that match your pipe diameter. For gas heaters, use fiberglass blankets for safety.
Safety First: When installing a tank blanket, do not cover the thermostat, the pressure relief valve, the drain valve, or the burner access panel at the bottom of a gas heater. Also, leave the top of a gas unit uncovered to ensure proper ventilation.
Insulate Exposed Pipes: Focus on insulating the first three to five feet of hot and cold water pipes connected to the heater. Continue insulating all accessible hot water pipes, especially those running through unheated garages, crawl spaces, or exterior walls.
Secure a Snug Fit: Wrap the blanket snugly around the tank and secure it with the provided tape or straps. Ensure there are no gaps. Cut foam sleeves to length and secure them over the pipes.
If you are uncomfortable with the process, particularly with ensuring proper clearances for gas units, professional installation by a team like ZH Plumbing guarantees safety and optimal performance.
4. Monitor and Maintain Water Heater Temperature Settings
The temperature dial on your water heater is more than just a setting; it's a critical control for your home's energy efficiency, safety, and comfort. Setting it to the optimal temperature, recommended at 120°F by the U.S. Environmental Protection Agency for most residential uses, balances adequate hot water supply with significant cost savings and reduced scalding risks.
Many manufacturers ship water heaters with a default setting of 140°F, which is unnecessarily high for typical household needs. This excessive temperature not only wastes energy keeping the water overly hot but also poses a serious burn hazard, especially for children and the elderly. Lowering it just 20 degrees can have a profound impact on your utility bills and home safety.
Why Temperature Management Is a Non-Negotiable Task
Regularly monitoring and maintaining your water heater's temperature is one of the simplest yet most effective water heater maintenance tips. This practice directly addresses energy waste, as standby heat loss increases with higher temperatures. For instance, Los Angeles families have reported saving up to $200 annually simply by maintaining a 120°F setting instead of 140°F. Furthermore, it's a crucial safety measure; hot water at 140°F can cause a third-degree burn in just five seconds.
Key Insight: A properly set thermostat minimizes mineral buildup and corrosion inside the tank, as high temperatures accelerate these processes. Consistent temperature management is a key factor in extending the unit's lifespan and preventing premature failure.
How to Safely Check and Adjust Your Water Heater Temperature
To ensure your water heater is operating efficiently and safely, follow these steps:
Test the Current Temperature: Don't rely solely on the dial. Run the hot water at the faucet farthest from the water heater for two minutes, then use a meat or cooking thermometer to get an accurate reading.
Locate and Adjust the Dial: For gas heaters, the thermostat dial is usually a visible knob on the front of the unit. For electric models, you may need to remove an access panel (or two) to find the thermostat(s). Always turn off the power at the circuit breaker before removing any panels on an electric unit.
Make Gradual Adjustments: Use a flathead screwdriver or the knob to adjust the temperature. If you make a change, wait at least three to four hours before re-testing the water temperature at the tap to allow the tank to adjust.
Mark Your Setting: Once you find the 120°F sweet spot, use a permanent marker or a small piece of tape to mark the position on the dial for future reference. For households with immunocompromised individuals or specific sanitation needs requiring 140°F, installing anti-scald mixing valves at faucets is a critical safety upgrade.
If your water heater's temperature fluctuates wildly or you're unable to adjust it, it could indicate a faulty thermostat or a failing heating element. In such cases, professional inspection is necessary to diagnose and resolve the issue safely.
5. Test the Temperature-Pressure Relief Valve Annually
The temperature-pressure relief (TPR) valve is arguably the most critical safety component on your water heater. This small valve is designed to automatically release water if the temperature or pressure inside the tank exceeds safe limits, preventing a catastrophic and dangerous explosion. An annual test is a non-negotiable water heater maintenance tip that ensures this vital safety feature will work when you need it most.
A stuck or malfunctioning TPR valve can lead to dangerous pressure buildup. For property managers in areas like Valley Village, proactive valve testing has been shown to prevent tens of thousands of dollars in water damage that would result from a tank rupture. Similarly, annual testing is often a requirement to meet insurance and California State Plumbing Code standards, making it essential for both residential and commercial properties.
Why Testing This Valve Is a Critical Safety Check
Testing the TPR valve ensures it hasn't become seized with mineral deposits or corrosion, which could prevent it from opening under extreme pressure. A functional valve is your tank's last line of defense against a potential explosion. In one documented case, a Glendale homeowner's annual inspection revealed a stuck valve, a simple fix that averted a potential disaster. This simple, two-minute test provides peace of mind and confirms your unit is operating safely.
Key Insight: The TPR valve is a safety device first and foremost. Skipping this annual test is like disabling the airbags in your car; you won't notice a problem until a crisis occurs, at which point it's too late.
How to Safely Test Your TPR Valve
Follow these steps to safely check if your TPR valve is functioning correctly:
Prepare the Unit: Turn off the electricity at the circuit breaker (for electric models) or switch the gas control knob to "Pilot" (for gas models). Place a bucket under the discharge pipe to catch water.
Perform the Test: Gently lift the lever on the TPR valve. You should hear a gurgling sound as air enters the tank and see hot water flow out of the discharge pipe.
Check the Seal: Release the lever. It should snap back into place, and the water flow should stop completely. A small drip or two immediately after is normal, but it should not leak continuously.
Identify Problems: If the lever is stuck, no water comes out, or water continues to leak after the test, the valve is faulty and must be replaced immediately. Do not attempt to force the lever.
A faulty TPR valve is a serious safety hazard. If you notice any issues during your test, or if you're uncomfortable performing it, it's crucial to seek professional help. For a comprehensive safety check, you can learn more about our professional gas line inspection and repair services.
6. Inspect for Leaks and Corrosion Quarterly
A small, unnoticed drip from your water heater can quickly escalate into a catastrophic failure, causing extensive and expensive water damage. Regular visual inspections are a cornerstone of preventative water heater maintenance, allowing you to catch early signs of trouble like leaks, rust, and corrosion before they become emergencies. A simple quarterly check takes just a few minutes but can save you thousands.
The goal is to spot issues when they are minor and inexpensive to repair. For example, a property manager in Pasadena identified a corroded fitting on a water heater during a routine inspection and had it replaced for a minimal cost, preventing a full-scale failure. Similarly, a Santa Monica homeowner prevented an estimated $20,000 in water damage by catching a small leak at the base of their tank during their quarterly check.
Why Quarterly Inspections Are So Crucial
Catching problems early is the key to avoiding both the cost and the headache of major plumbing emergencies. A tiny leak can saturate drywall, warp flooring, and create a perfect environment for mold growth in a matter of days. Regular inspections for leaks are critical, as undetected issues can escalate quickly. For a deeper dive into the potential outcomes, consider reading about understanding the intricacies of water damage. Systematic quarterly inspections have been shown to drastically reduce emergency plumbing calls.
Key Insight: Most catastrophic water heater failures don't happen suddenly. They start as small, tell-tale signs like a tiny rust spot or a slow drip. A quarterly visual check is your first and best line of defense against a flooded garage or basement.
How to Perform a Thorough Visual Inspection
Set a recurring calendar reminder every three months to perform this quick but vital check. Follow these steps for an effective inspection:
Check All Connections: Carefully look at the cold water inlet and hot water outlet pipes at the top of the tank. Also, inspect the temperature and pressure relief (T&P) valve and the drain valve at the bottom.
Look for Discoloration: Scan the entire tank exterior for streaks of orange, brown, or white. These colors often indicate a slow leak or advanced internal corrosion.
Examine the Base: The area where the tank meets the floor is a critical inspection point. Look for any signs of moisture, standing water, or rust stains on the floor.
Use Your Senses: Sometimes a leak is too small to see easily. Run a dry hand or paper towel around all fittings and connections. If you feel any moisture, it’s a sign that a seal is failing.
If you discover any signs of a leak, especially a gas water heater leak, it requires immediate professional attention. For expert assistance, you can learn more about our gas water leak detection services. Documenting any concerns with a photograph can also be helpful when you call for service.
7. Install and Maintain Water Shut-Off Valves for Safety Compliance
A functioning water shut-off valve is your first line of defense against catastrophic water damage from a burst tank or leaking pipe. Automatic water shut-off valves take this protection a step further, using sensors to detect leaks and automatically stop the water flow. For homeowners in Los Angeles, these systems are not just a smart upgrade; they are increasingly required by insurance companies to meet California's stringent safety standards and mitigate risk.
Whether manual or automatic, the primary purpose of a shut-off valve is to give you immediate control over the water supply to your heater and your entire home. A slow leak can silently cause thousands of dollars in damage to floors, walls, and foundations, while a catastrophic tank failure can flood a home in minutes. Proper maintenance and strategic installation of these valves are crucial water heater maintenance tips that protect your property and provide peace of mind.
Why Shut-Off Valves Are a Non-Negotiable Safety Feature
Regularly testing your manual shut-off valve and installing an automatic system can be the difference between a minor cleanup and a major renovation. A Glendale rental property owner, for instance, secured a 12% insurance discount after installing an automatic valve system. Similarly, a Valley Village resident avoided disaster when a slow leak from their water heater triggered the automatic shut-off while they were away on a two-week vacation, preventing extensive damage.
Key Insight: Knowing where your main water shut-off is and confirming it works can save you tens of thousands of dollars. An automatic shut-off system acts as a 24/7 watchdog, protecting your home even when you're not there.
How to Safely Maintain and Utilize Shut-Off Valves
Follow these essential steps to ensure your shut-off valves are ready to perform when you need them most:
Locate and Label: Find both the main water shut-off valve for your house and the specific cold water inlet valve for your water heater. Label them clearly so anyone in the household can find them in an emergency.
Quarterly Testing: At least once every three months, test your manual shut-off valves. Turn them clockwise slowly until they are fully closed, then open them again. This prevents them from seizing up from mineral buildup. If a valve is stuck, do not force it; call a professional.
Install Leak Detection: Place a battery-powered water leak detector on the floor next to your water heater. These inexpensive alarms will sound off at the first sign of moisture, giving you an early warning.
Consider an Automatic System: For ultimate protection, a professionally installed automatic shut-off system is invaluable. These systems are placed on the main water line and use sensors placed near appliances like water heaters and washing machines to detect leaks.
If you are unsure about the condition of your valves or want to explore the benefits of an advanced safety system, you can learn more about automatic water shut-off valves and their professional installation.
8. Schedule Professional Inspections Every 2-3 Years
While DIY maintenance tasks are crucial, some potential issues are nearly impossible for a homeowner to spot without professional training and tools. Scheduling a professional inspection every two to three years is a vital water heater maintenance tip that provides a deeper, more comprehensive health check for your unit, identifying hidden dangers and inefficiencies.
Licensed plumbers can detect problems like subtle gas leaks, improper venting that could lead to carbon monoxide exposure, faulty electrical connections, and internal corrosion that isn't visible from the outside. These inspections go beyond simple upkeep, focusing on the safety, compliance, and long-term viability of your system, which is especially important for insurance purposes in California.
Why Professional Inspection Is a Smart Investment
A professional evaluation extends your equipment's life and ensures it operates safely and according to local codes. For instance, a recent inspection for a Hollywood homeowner uncovered faulty venting that was silently leaking carbon monoxide. In another case, a Pasadena property manager's routine inspection caught a failing valve that, if left unnoticed, could have caused over $15,000 in emergency water damage. These preventative checks safeguard both your property and your family.
Key Insight: Many insurance claims related to water heater failure in areas like Santa Monica have been approved specifically because the property owner could provide records of recent, professional inspections, proving they performed due diligence in maintaining the equipment.
How to Get the Most Out of Your Professional Inspection
To ensure you receive maximum value and actionable insights, follow these best practices:
Proper Timing: Schedule your inspection during a lower-demand season, like spring or early summer, before your system is heavily taxed.
Verify Credentials: Always choose a licensed, insured, and reputable plumbing company. Check their credentials and local reviews.
Request Documentation: Ask for a detailed written report of the findings, including photographs of any identified issues. This creates a valuable service history for your unit.
Get a Lifespan Estimate: Ask the plumber for their professional opinion on the remaining lifespan of your water heater to help you budget for future replacement.
Keep Records: File all inspection reports with your home maintenance records. These documents are invaluable for warranty claims and insurance purposes.
If an inspection reveals that your unit is nearing the end of its life or requires significant repairs, it might be time to consider a modern, more efficient replacement. A professional can provide guidance on the best options for your home's needs and help you with a new water heater installation.
8-Point Water Heater Maintenance Comparison
Maintenance Action | 🔄 Implementation Complexity | ⚡ Resources & Time Required | 📊 Expected Outcomes | Ideal Use Cases | ⭐💡 Key Advantages & Quick Tip |
|---|---|---|---|---|---|
Flush Your Water Heater Tank Annually | Medium — drain and flush; may need pro for heavily calcified tanks | 30–45 min DIY; pro $150–$300; garden hose, drain access | Removes sediment, improves efficiency, extends life 15–20% in examples) | Homes in hard-water areas, older tanks, commercial buildings with heavy use | Prevents repairs and maintains efficiency. Tip: turn off heater, cool 2 hrs, flush slowly to avoid clogs. |
Check & Replace Anode Rod Every 3–5 Years | Low–Medium — partial drain and rod removal; simple for plumbers | 30–60 min; rod $50–$150; pro $150–$300 | Prevents tank corrosion, can extend life 10–15 years | Older tanks, hard-water regions, long-term maintenance plans | Most cost-effective protection. Tip: replace if diameter <½" or every 2–3 yrs in hard water. |
Insulate Tank and Pipes | Low — straightforward DIY but avoid covering controls | DIY $30–$100; pro $200–$400; 1–2 hours | Reduces heat loss; lowers water-heating costs (~10–15%); improves temperature consistency | Long pipe runs, unconditioned spaces (garages, crawlspaces) | Quick ROI (6–12 months) and energy savings. Tip: don't cover valves/thermostat; use fiberglass for gas heaters. |
Monitor & Maintain Temperature Settings | Very low — adjust thermostat and check monthly | Free monitoring; $50–$200 if thermostat replacement; minutes monthly | Lowers energy use (≈3–5% per 10°F reduction), reduces scald risk, extends component life | Households with children/elderly, efficiency-focused owners | Simple safety and savings. Tip: set to 120°F for most homes; use mixing valves if higher temps required. |
Test Temperature‑Pressure Relief (TPR) Valve Annually | Low — quick manual test but requires caution | ~5 minutes DIY; pro $75–$200; replacement $50–$150 | Confirms critical safety function; prevents overpressure events and liability | All homes and commercial units; insurance/code compliance | Critical safety check. Tip: shut power/gas, let cool, lift lever gently and document results. |
Inspect for Leaks & Corrosion Quarterly | Very low — visual check takes minutes | Free DIY; $75–$150 for pro assessment if issues found | Early detection of leaks/corrosion reduces emergency repairs and major water damage | All properties, rentals, high‑risk installations | Early problem detection saves big costs. Tip: keep checklist, photograph issues, set calendar reminders. |
Install & Maintain Water Shut‑Off Valves (Automatic/Manual) | High — professional installation and annual maintenance | Manual $200–$400; automatic whole‑house $800–$2,000; ongoing testing | Prevents catastrophic water damage; can lower insurance premiums and liability | Vacation homes, rentals, elderly occupants, insurance‑required properties | Major damage prevention and insurance benefits. Tip: test quarterly and ensure backup power for smart systems. |
Schedule Professional Inspections Every 2–3 Years | Medium — coordination and access required | $100–$200 per inspection; longer for complex systems | Comprehensive diagnostic, code compliance, warranty documentation, catches hidden issues | Units >10 years, rental portfolios, pre‑sale or insurance purposes | Expert assessment and planning for replacement. Tip: choose licensed plumbers and request written reports/photos. |
Your Next Step for a Healthy Water Heater
You've just navigated a comprehensive checklist of water heater maintenance tips, moving from simple annual flushes to critical safety checks like testing the T&P valve. Embracing this proactive approach is the single most powerful strategy for ensuring your water heater delivers consistent, efficient, and reliable service for years to come. It’s the difference between a system that lasts a decade or more and one that fails prematurely, leaving you with a cold shower and a costly emergency replacement.
The core takeaway is that small, consistent actions compound over time. An annual tank flush prevents the slow, damaging buildup of sediment. A periodic check of the anode rod stops corrosive elements before they can eat through your tank. And a quick quarterly inspection for leaks can catch a minor drip before it becomes a major flood. These aren't just chores; they are investments in your home’s longevity, your family’s comfort, and your financial peace of mind. By integrating these practices into your home maintenance routine, you transform from a reactive homeowner into a proactive one, sidestepping the most common and expensive water heater pitfalls.
From Knowledge to Action: Your Maintenance Roadmap
Mastering these concepts is about more than just avoiding repairs; it's about gaining control over one of your home’s most essential appliances. Understanding the why behind each task, from temperature settings impacting your energy bill to the role of an anode rod in preventing rust, empowers you to make smarter decisions.
Here are your actionable next steps:
Create a Schedule: Don't let this information fade. Use a digital calendar or a simple checklist on your water heater to set reminders for key tasks. Mark dates for your annual flush, T&P valve test, and quarterly visual inspections.
Start with the Basics: If you're new to this, begin with the simplest, highest-impact tasks. This week, check your temperature setting and perform a visual inspection for leaks or rust. These take just a few minutes and provide immediate insight into your unit's health.
Assess Your DIY Comfort Level: Be honest about your skills. While tasks like flushing the tank are manageable for many, replacing an anode rod or inspecting gas lines requires more confidence and the right tools. For a deeper dive into extending your system's life and ensuring safe operation, explore these essential hot water maintenance tips.
Know When to Call a Professional: Recognizing the signs of trouble is a crucial skill. Banging noises, discolored water, a pilot light that won’t stay lit, or any sign of a gas leak are non-negotiable signals to call for expert help immediately. For property managers and developers in Los Angeles, establishing a professional maintenance plan ensures compliance and protects your investment across multiple units.
Ultimately, your water heater is an unsung hero, working tirelessly behind the scenes. By giving it the attention it deserves, you ensure it can continue its vital role safely and efficiently. This proactive maintenance mindset not only saves you money on utility bills and emergency repairs but also provides the invaluable comfort of knowing your home's systems are in top condition.
Ready to take the guesswork out of water heater care? The expert technicians at ZH Plumbing offer comprehensive inspections, maintenance, and repair services across the Greater Los Angeles area. Contact us today to schedule your professional tune-up and ensure your system is operating at peak performance.
Comments