


How to Detect Water Leaks: A Los Angeles Homeowner's Guide
- Jan 10
- 13 min read
A sudden spike in your water bill or the maddening sound of dripping in the walls isn't just an annoyance—it's your home signaling a problem. Unchecked water leaks can lead to costly structural damage, unhealthy mold growth, and shockingly high utility bills. Catching the early signs is the key to preventing a small issue from becoming a full-blown disaster.
This guide will walk you through the practical steps to find leaks, from simple visual checks to using your water meter like a pro, so you can protect your property and your peace of mind.
The Real Cost of a Hidden Water Leak

In Los Angeles, an undetected water leak can quietly rot away structural beams, invite mold into your home, and rack up thousands in damages before you even know it's there. Ignoring what seems like a small drip is a financial gamble you don’t want to take—the cumulative damage over time can be shockingly destructive.
According to the U.S. Environmental Protection Agency, the average American household leak can waste 10,000 gallons of water annually. That's enough to wash nearly 300 loads of laundry. Nationally, household leaks waste almost 1 trillion gallons of water every single year.
Why Proactive Detection Matters
Insurance companies have found that most water damage claims come not from catastrophic pipe bursts but from slow, gradual leaks that go unnoticed for months. This is why regular checks are no longer just a good idea; they're an essential part of home maintenance.
Being proactive is your best line of defense. A few simple habits can save you a world of trouble:
Inspect Appliance Hoses: Regularly check the hoses for your washing machine, dishwasher, and ice maker. If they look cracked, brittle, or bulging, replace them before they fail.
Monitor Your Water Bill: A sudden, unexplained jump in your monthly bill is a classic red flag for a hidden leak. Don't just pay it—investigate it.
Know Your Plumbing: Understanding the age and material of your home's pipes (like copper, galvanized steel, or PEX) helps you anticipate where failures are most likely to occur.
A slow leak is more than wasted water. It’s a silent threat to your home's structural integrity and your family's health. The cost of doing nothing far outweighs the effort of a quick monthly check.
To help you get started, here is a simple checklist to help you identify the most common signs of a leak and know what to do next.
Quick Leak Detection Checklist
This table breaks down common symptoms, where the problem might be lurking, and the first thing you should do.
Symptom | Potential Location | First Action Step |
|---|---|---|
Unusually High Water Bill | Anywhere in the system; often hidden underground or in walls | Perform a water meter test to confirm an active leak. |
Sound of Running Water | Toilets, main water line, behind walls or under floors | Check all toilets for silent leaks using the food coloring test. |
Musty Odors or Mold/Mildew | Basements, crawl spaces, bathrooms, under sinks | Visually inspect for dampness, discoloration, or visible mold growth. |
Damp Spots or Stains | Ceilings, walls, floors | Check fixtures on the floor above; look for signs of a roof or pipe leak. |
Low Water Pressure | Main water line, multiple fixtures simultaneously | Could be a significant leak in the main line; check the area between the meter and your house. |
Warped Floors or Peeling Paint | Near bathrooms, kitchens, laundry rooms | Indicates prolonged moisture exposure; inspect adjacent fixtures and pipes. |
Using this checklist can help you pinpoint issues faster and take control before a small problem escalates.
Getting ahead of potential damage is key. It's smart to have a plan, which includes creating a detailed home inventory for insurance before you need it. And remember, nothing beats a professional set of eyes. Regular evaluations are crucial, and you can learn more about the importance of plumbing inspection services in our related guide.
Your First Clues: Visual and Auditory Checks
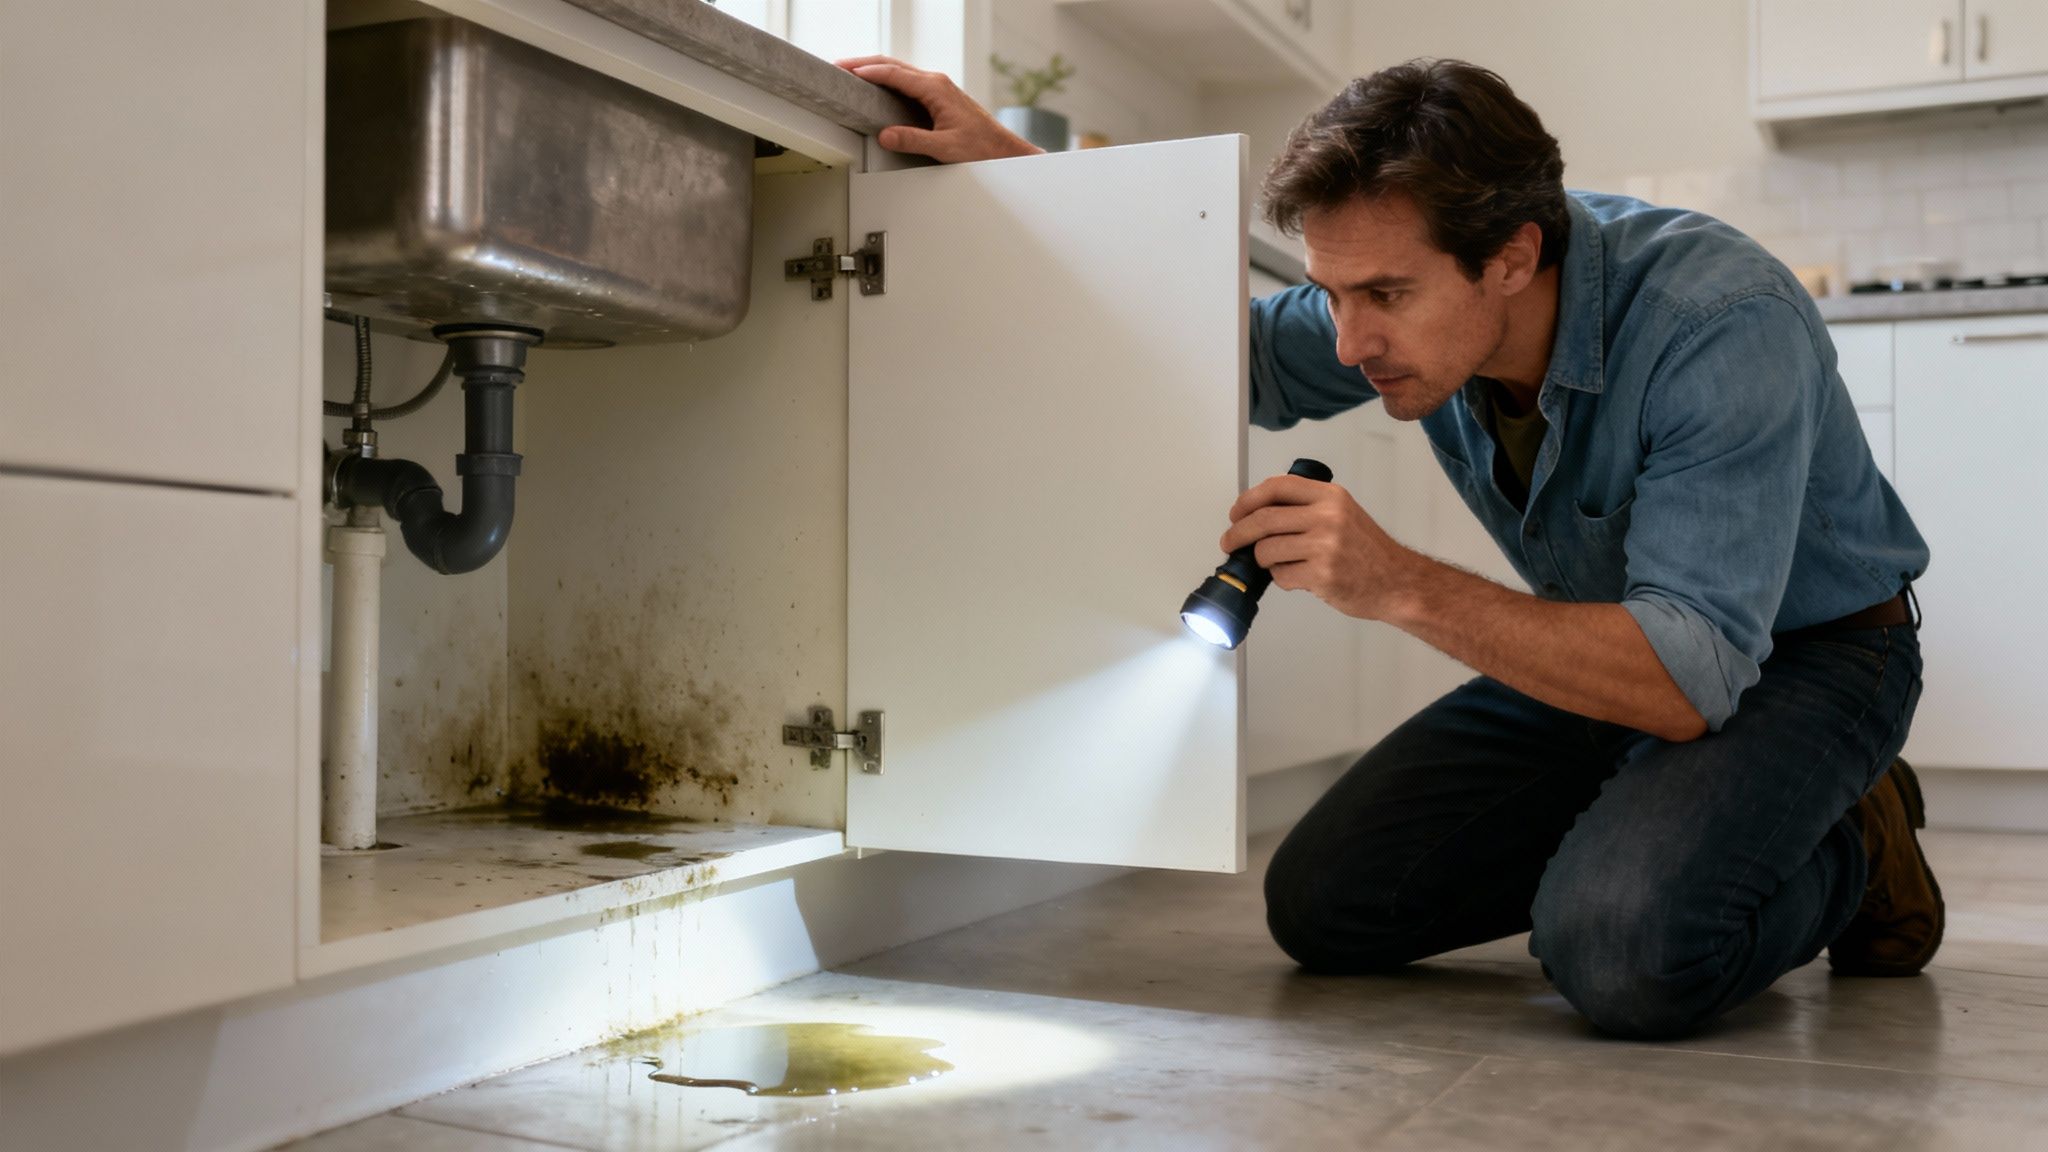
Before you think about specialized equipment, grab a flashlight and use your senses. Your own eyes and ears are incredibly effective at detecting common plumbing problems. A quick, focused walkthrough is often all it takes to find the source.
Start where water is used most: under kitchen and bathroom sinks, behind toilets, and around the supply lines for the washing machine and dishwasher. These spots are the usual suspects for leaks.
Spotting the Telltale Visual Signs
Water damage makes itself known, but the early signs can be easy to miss. Catching them early can save you from costly repairs. Keep an eye out for these classic giveaways:
Discoloration and Stains: Yellow or brown rings on your ceilings or walls are a dead giveaway for a slow, persistent leak from the floor above.
Changes in Texture: Paint or wallpaper that is bubbling, peeling, or looks wavy is a sure sign moisture is trapped behind the surface.
Warped Materials: Check your baseboards and floorboards for any buckling. If the wood under your sink cabinet feels soft or spongy, you have a problem.
Visible Mold or Mildew: A musty smell you can’t get rid of is often caused by mold, which needs moisture to grow. Shine a flashlight in dark corners, behind appliances, and inside cabinets.
It’s not just about finding an active drip; you need to spot the damage left behind. If you have wood floors, spotting signs of water damage on wood floors is a critical skill.
Listening for Hidden Leaks
Sometimes, what you hear is more telling than what you see. Leaks inside walls or under the floor often give themselves away with a faint but constant sound. The best time to check is late at night when the house is silent.
Make sure every water-using appliance is off—no dishwasher, washing machine, or ice maker. Then, listen. Can you hear a faint hissing, dripping, or rushing sound? Get close to the walls that house the plumbing for your kitchen and bathrooms.
A subtle hissing sound from within a wall is a major red flag. This often points to a pressurized pipe with a pinhole leak that is spraying water continuously, leading to severe and rapid damage.
Taking a few minutes for these simple inspections is one of the smartest things you can do as a homeowner. For more ways to stay ahead of trouble, check out our guide on essential plumbing tips for Los Angeles homeowners. If any of this looks or sounds familiar, it's time to move on to a more definitive test.
Using Your Water Meter to Confirm a Leak
If you’ve checked all the usual spots and still suspect a leak, it’s time to let your water meter provide a definitive answer. Think of it as the ultimate truth-teller for your plumbing system—it gives you hard data, confirming once and for all if you have a hidden leak.
This simple test is the single most reliable way to know if your home is losing water, and it costs nothing but a little bit of time.
First, you’ll need to find your meter. For most homes in the Los Angeles area, it's located by the curb under a concrete or metal lid. You might also find it on the side of your house.
How to Read Your Water Meter
Once you've located it, you'll need to know what you're looking at. Meters generally come in two types, and figuring out which one you have is key to an accurate reading.
Analog Meters: These have a classic style, similar to a car's odometer, with a large sweep hand that spins as water flows. For this test, focus on the tiny triangle or star-shaped dial. This is the low-flow indicator.
Digital Meters: These are more straightforward, with a direct numerical readout. They often have a flow rate display that appears when water is actively being used.
That little low-flow indicator is your best friend for catching sneaky, slow drips. Even a leak so small that the main dial doesn't seem to move will cause that tiny triangle to spin. It’s a dead giveaway.
The Water Meter Test: Step-by-Step
Now that you know your meter, the test is easy. The most important part is making sure absolutely no water is being used anywhere on your property. Every faucet, shower, washing machine, dishwasher, and sprinkler system must be completely off.
With everything shut down, head back to your meter.
Get a Baseline: Write down the numbers on the dial. A quick photo with your phone is a great way to capture the exact reading, especially the position of the sweep hand and low-flow indicator on an analog meter.
Wait it Out: Leave all the water off for at least one to two hours. Don't flush any toilets or get a glass of water, as any usage will skew the test. The longer you wait, the more a slow leak will become apparent.
Check Your Results: After the waiting period, go back and look at the meter again.
Has the reading changed? Is the sweep hand in a different spot? If the numbers have climbed, you have a leak. It’s a clear signal that water is escaping somewhere between the meter and your home.
Pinpointing the Source: Toilets and Fixtures
So, your water meter test confirmed a leak. Now the detective work begins. We need to narrow down the suspects, and the first place to look is the toilet.
A silent leak from a faulty toilet flapper is the most common and wasteful culprit in any home. It can waste hundreds of gallons of water a day without you ever hearing a thing, causing a major spike in your water bill.
Fortunately, there’s a simple, five-minute trick to catch it.
The Toilet Dye Test
This is the go-to test for finding a sneaky toilet leak. It's incredibly effective and gives you a clear answer in minutes.
Remove the Tank Lid: Carefully take the lid off the back of your toilet tank and set it somewhere safe.
Add Dye to the Tank: Put about 10-15 drops of dark food coloring into the tank water. Blue or green works well. The key is do not flush.
Wait 15-20 Minutes: Let the colored water sit in the tank. This gives it time to seep into the bowl if there is a leak.
Check the Bowl: After the time is up, look inside the toilet bowl. If you see any trace of color, you’ve found your leak.
If dye made its way into the bowl, it means water is seeping out from the tank. The problem is almost always a worn-out or poorly sealed flapper. It’s a common issue and one of the easiest and cheapest plumbing repairs to do yourself.
For a more detailed walkthrough, check out our guide on essential toilet repair tips every homeowner should know.
A single running toilet can waste over 200 gallons of water per day. That’s more than 6,000 gallons a month! The dye test is your best weapon against this kind of silent, money-draining problem.
The flowchart below gives you a visual of this whole process, from confirming the leak with your meter to starting the fixture-by-fixture investigation.
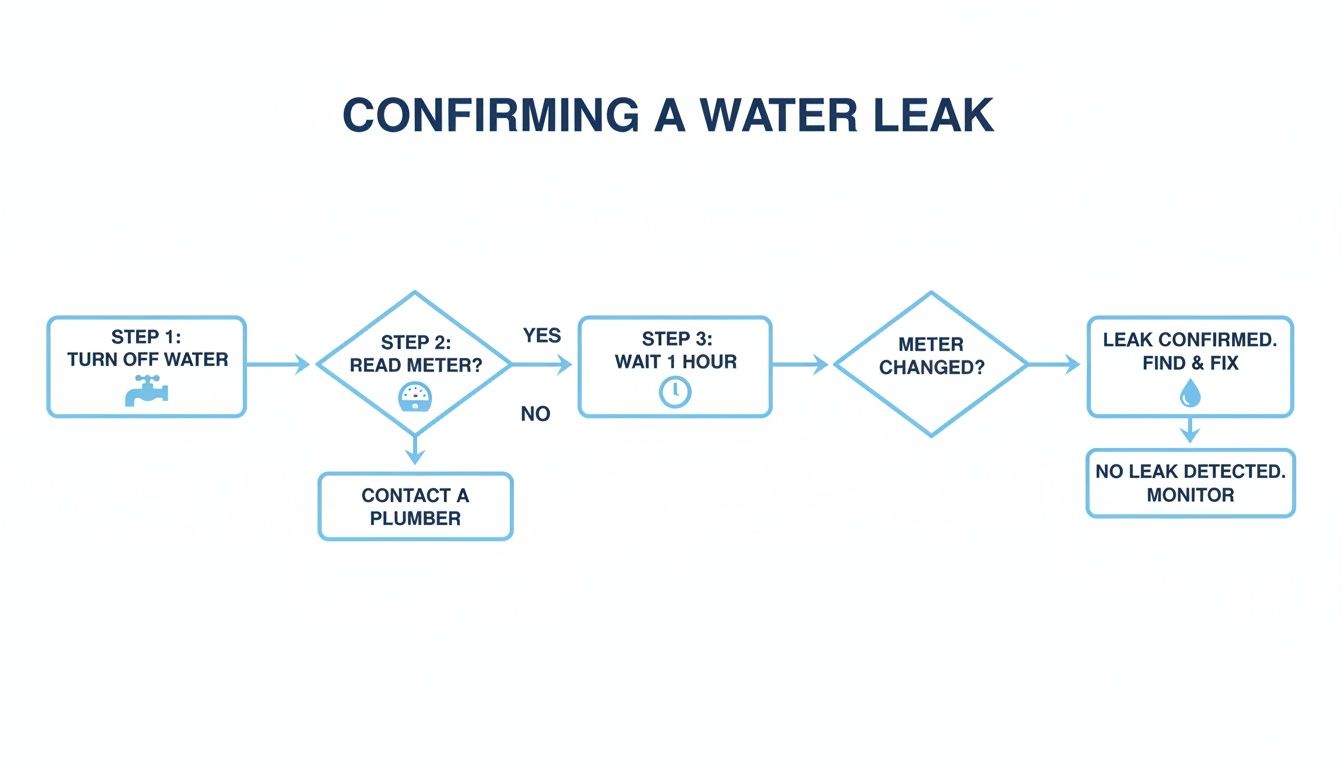
As you can see, it’s a logical flow: shut off the water, read the meter, wait, and check for any change. If the meter moved, it's time to hunt down the source.
Inspecting Other Fixtures
If all your toilets passed the dye test, move on to a methodical check of every other water-using fixture in and around your home. Even a slow drip from a faucet adds up fast.
Faucets: Look under every sink in your house—kitchen, bathrooms, laundry room—for any signs of moisture. Run your fingers along the flexible supply lines to feel for even the smallest drips.
Showerheads: A dripping showerhead usually indicates a worn internal washer or O-ring. After you shower, wait a few minutes and listen for a faint drip... drip... drip.
Outdoor Hose Bibs: This is an often-forgotten spot. Go outside and check your spigots. Unscrew any hoses and then check if the faucet itself drips when it’s turned off completely. A small leak here can go unnoticed for an entire season.
By working your way through the house and systematically checking each potential source, you can often find the leak yourself and give a plumber a huge head start if you need to call a professional.
Advanced Detection for Hidden Leaks
Sometimes, the water meter continues to spin even after you've checked every faucet, toilet, and visible pipe. This points to a hidden leak, and this is where DIY efforts should stop and professional technology becomes necessary.
When a leak is inside a wall, under your floor, or beneath a concrete slab, finding it requires specialized gear. These sneaky leaks can cause the most damage, and trying to find them by guesswork—smashing through walls or floors—is a messy and expensive gamble.
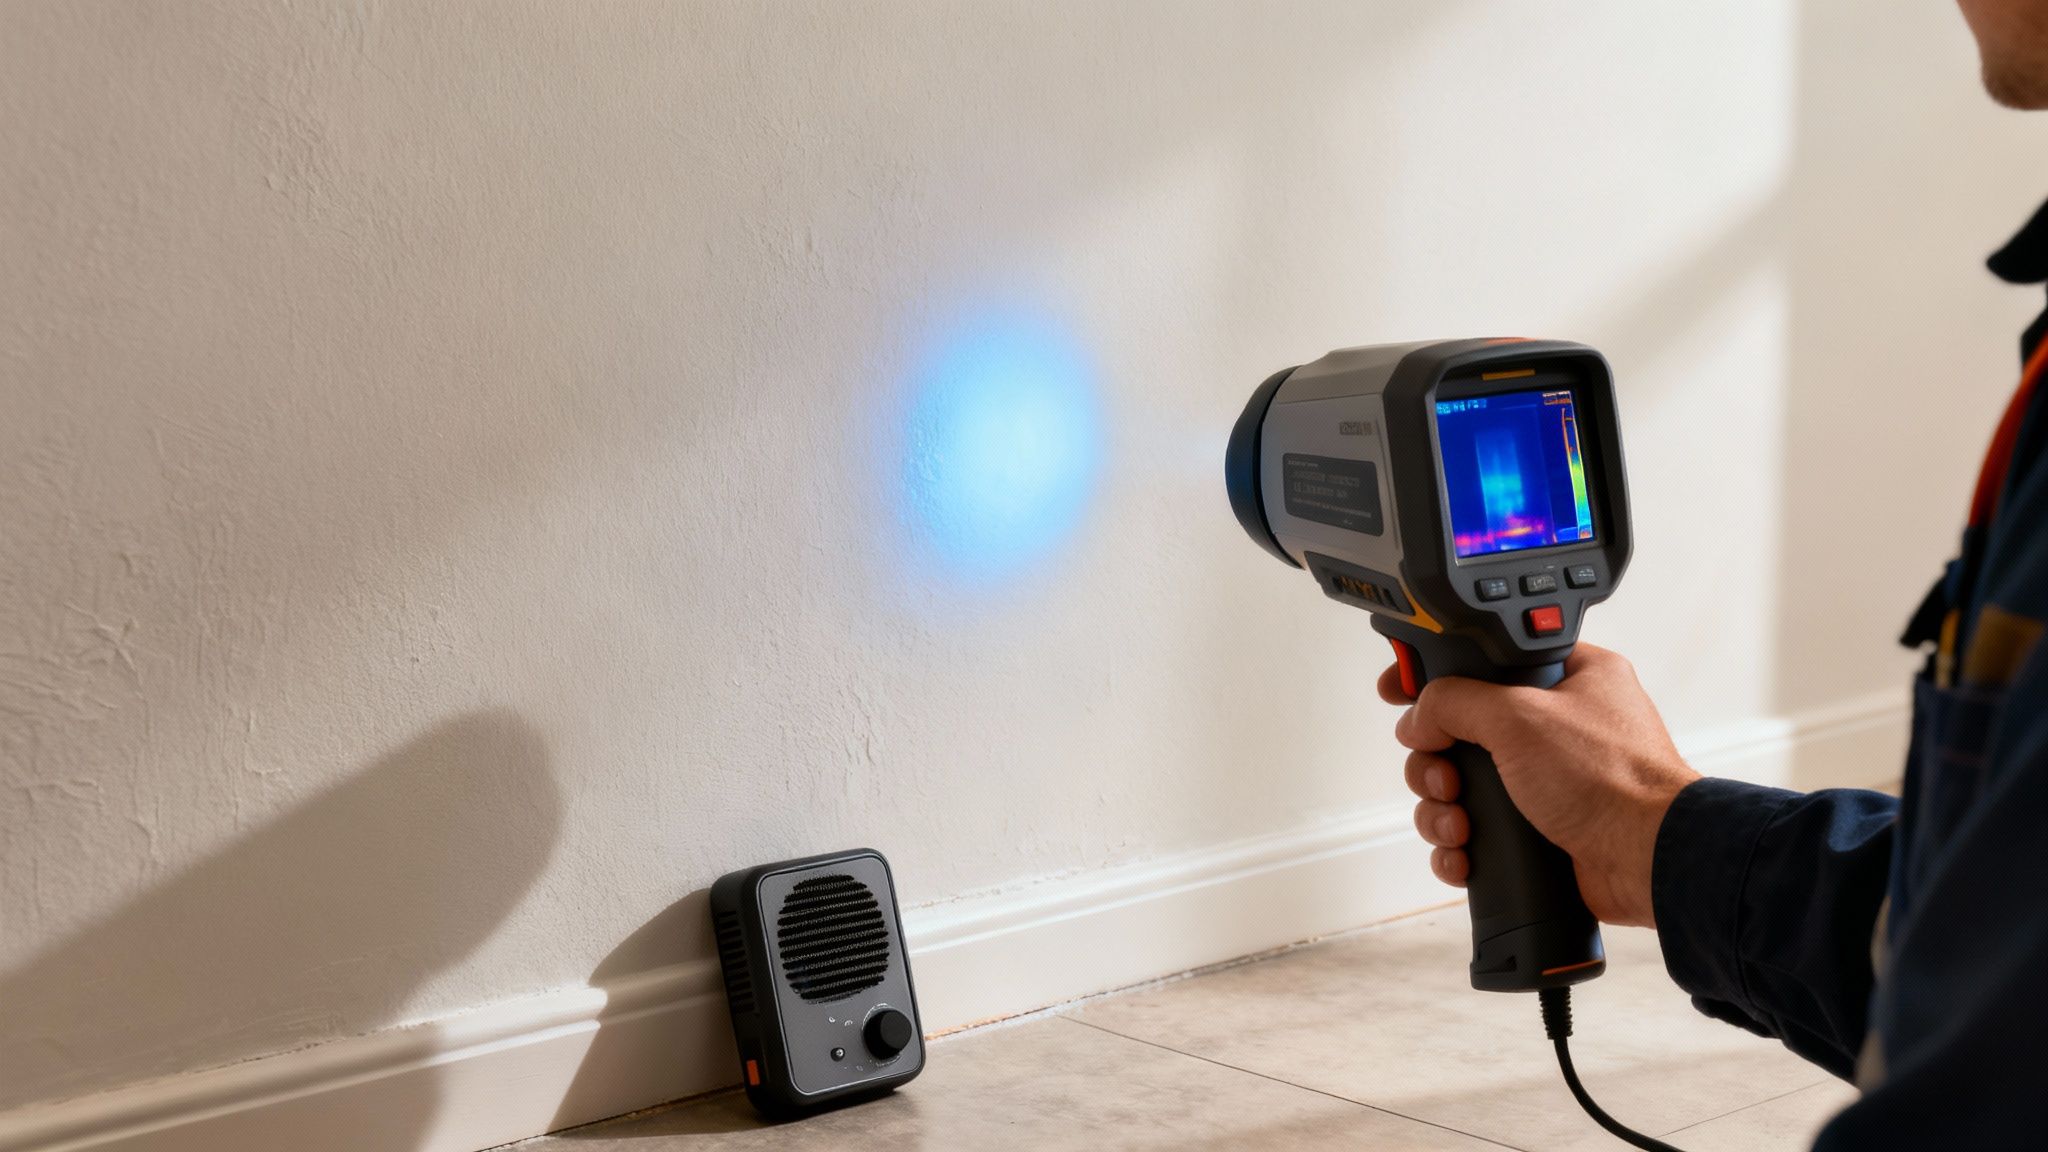
Non-Invasive Leak Detection Technology
Modern plumbing has moved far beyond the sledgehammer approach. Professional plumbers use advanced, non-invasive tools to pinpoint the exact location of a hidden leak with incredible accuracy, saving your home from unnecessary damage.
Two of the most powerful technologies are:
Acoustic Listening Devices: Think of it as a stethoscope for your plumbing. These highly sensitive microphones can pick up the distinct sound frequencies of water escaping a pressurized pipe, even through thick concrete. A skilled technician can follow the sound to its loudest point, zeroing in on the leak's origin.
Thermal Imaging Cameras: An infrared camera doesn't see water, but it sees temperature differences. Water leaking inside a wall or under a floor makes that area cooler or warmer than the surrounding material. This temperature difference shows up as a clear thermal signature on the camera's display.
A suspected slab leak is never a DIY job. The potential for catastrophic damage to your home's foundation is just too high. Professional detection is the only safe and effective way to locate a leak under your slab without causing even more destruction.
These tools allow us to create a precise map of the issue. That way, if we do need to open a wall, the work is targeted and minimally disruptive. For leaks buried deep in your drain lines, we often use a professional sewer camera inspection to get a live video feed and visually confirm the damage.
Knowing when to call for help is key to preventing a small problem from turning into a disaster.
DIY vs. Professional Leak Detection
Deciding whether to tackle a leak yourself or call in the pros can be tricky. This table breaks down common scenarios to help you make the right call.
Leak Symptom | Recommended DIY Action | When to Call a Professional |
|---|---|---|
Dripping Faucet or Showerhead | Check for worn-out washers or O-rings. Tighten connections. Most parts are available at a hardware store. | If the dripping continues after basic repairs, or if you're uncomfortable disassembling the fixture. |
Running Toilet | Use the dye test. Check the flapper, fill valve, and float for proper function and replace if needed. | If the toilet continues to run after replacing common parts or if the leak appears to be from the toilet's base. |
Visible Puddle Under a Sink | Check the P-trap and supply line connections. Tighten them by hand first. Place a pan to catch drips. | If tightening doesn't stop the leak, or if pipes appear corroded. This is especially true for persistent leaks. |
High Water Bill with No Obvious Leaks | Perform the water meter test to confirm an active leak. Inspect all visible fixtures and appliances. | If the meter test indicates a leak but you can't find the source anywhere inside or outside your home. |
Musty Odors or Mold Growth | Look for corresponding water stains on walls, ceilings, or floors to pinpoint the moisture source. | Immediately. Mold indicates a long-term moisture problem, likely from a hidden pipe leak that needs expert location. |
Warm Spots on the Floor or Sound of Running Water | None. Do not attempt to break through flooring or foundation. | Immediately. These are classic signs of a slab leak, which requires specialized acoustic and thermal equipment. |
While DIY fixes are great for minor, visible issues, any sign of a hidden leak is your cue to bring in an expert. It’s the safest and most cost-effective decision in the long run.
Proactive Solutions to Prevent Future Leaks
Spotting and fixing a leak is one thing, but prevention is the best strategy. Shifting your mindset from reacting to problems to actively preventing them can save you significant stress and money. This is especially true in older Los Angeles homes where plumbing systems have seen decades of wear.
Regular maintenance and understanding your plumbing infrastructure are the cornerstones of a proactive approach. Do you know the age and material of your pipes—are they copper, galvanized steel, or PEX? A routine professional plumbing inspection can pinpoint corrosion, worn-out fittings, and pressure problems long before they turn into an emergency.
Embracing Smart Home Technology
The real game-changer in modern leak prevention is smart home technology. Devices like automatic water shut-off valves have transformed how we protect our properties. These systems are installed on your main water line, acting as a 24/7 security guard for your entire plumbing network.
Using advanced sensors, they monitor the water flowing through your home. If the device spots an unusual pattern—like water running continuously for too long or a sudden surge—it assumes a leak or burst pipe has occurred.
Within seconds of detecting a potential disaster, the valve automatically snaps shut, cutting off the main water supply to the house. That single action can turn a catastrophic flood into a minor, manageable inconvenience.
To learn more about how these systems work and the peace of mind they offer, check out our complete guide to automatic water shut-off valves.
The Bigger Picture: Insurance and Infrastructure
This forward-thinking approach is more important than ever. Globally, it's estimated that utilities lose 20–30% of all treated water due to leaks in aging pipelines. This massive issue has led insurance companies and municipalities to encourage property owners to take responsibility for their own systems. For a deeper dive, you can review the research on water pipeline leak detection systems.
For California homeowners, the benefits hit closer to home. Many insurance carriers now offer significant discounts on premiums for properties equipped with smart shut-off devices. Installing one isn't just an investment in your home's safety; it’s a smart financial move that often pays for itself through lower insurance costs and avoiding costly water damage claims.
Common Questions About Water Leak Detection
Here are some direct, practical answers to the most common questions our team gets from Los Angeles homeowners about finding and dealing with leaks.
How Can I Tell If a Water Leak Is an Emergency?
A leak becomes an emergency when it poses an immediate threat to your property or safety. This includes active flooding, water pooling near electrical outlets, or a ceiling that is visibly sagging under the weight of water. If you can't stop the flow of water, it's an emergency. A minor drip from a faucet, however, can usually wait for a scheduled service call.
In a plumbing emergency, your first and most critical move is to locate and shut off the main water valve to your house. Once the water is off, call a 24/7 emergency plumber immediately.
Does Homeowners Insurance Cover Damage from Leaks?
The answer depends on the cause of the leak. Most standard policies cover damage from sudden and accidental events, like a pipe that bursts unexpectedly.
However, they almost always exclude damage from slow, gradual leaks that result from a lack of maintenance. This is why knowing how to detect water leaks proactively is so important—it shows you're taking responsible care of your property, which can be a huge factor when filing a claim.
How Much Does Professional Leak Detection Cost?
The cost can vary depending on the leak's location and how difficult it is to find. A simple diagnostic visit for an obvious issue is typically affordable. However, pinpointing a hidden slab leak with advanced electronic equipment will cost more.
Think of it as an investment. The price of professional detection is a small fraction of the thousands you could spend on repairs from unchecked water damage. It pays for itself by helping you avoid much bigger costs down the road.
If you suspect a hidden leak or are facing a plumbing emergency, the team at ZH Plumbing is ready to help. Don't let a small issue turn into a major disaster—contact us for a free inspection and expert service.